Guide for:
Guide · v1.2

From unboxing to a balanced spindle.

Everything you need to get the GrayVolt sensor onto your machine, talking to your phone, and telling you something useful. No laptop. No app. No account.

Read time ~10 min
SKU Spindle Balancer
Updated April 2026
CHAPTER 01

What's in the box.

A single sensor, a USB-C cable, and the bits you need to attach it to a machine. The Balancer kit adds a clip-on IR tachometer.

GrayVolt sensor, ISO view

The sensor, up close

  • A
    Status LEDTop-face. Red on boot → amber while the radio comes up → solid green when the captive portal is live.
  • B
    3.5 mm tach inputBalancer kit only. Accepts the bundled IR tach sensor. TRS; signal on tip, power on ring, GND on sleeve.
  • C
    USB-C power5 V, 200 mA typical. Any phone charger, laptop port, or battery bank works. No data link — power only.
  • D
    Magnetic baseHolds firmly to any ferrous housing. For aluminum or plastic, use the bundled VHB strip.
Top of sensor
A · Status LED
Green means go
Solid green = running, portal live. Slow pulse = AP idle. Red = boot or fault.
Ports, tach and USB-C
B · C · Ports
Tach in, power in
3.5 mm for the IR tach (Balancer kit). USB-C for 5 V power.
Bottom magnetic base
D · Base
Stick or clamp
Magnetic base for ferrous housings. VHB adhesive pad included for everything else.
CHAPTER 02

Mount and power.

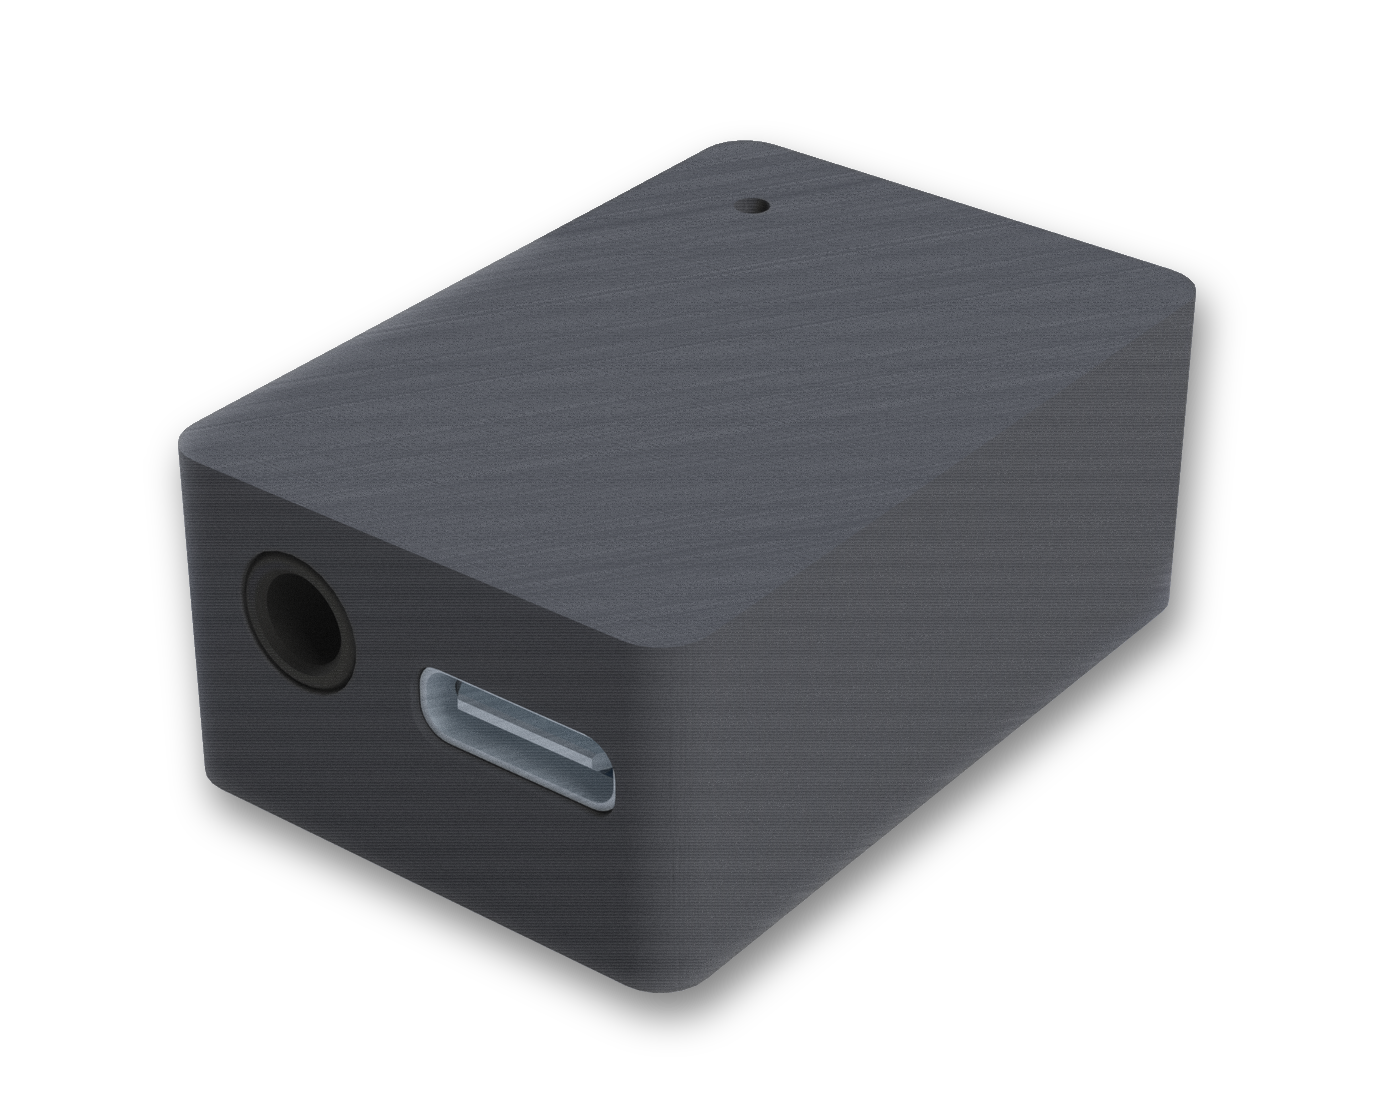
Fifteen minutes, five steps. Get the sensor onto the machine and the LED solid green.

01
Pick a mounting location
As close to the spindle bearing housing as possible. Radial (perpendicular to the shaft) gives the cleanest 1× signal for balancing. Axial works for general health monitoring.
02
Clean the surface
Isopropyl alcohol, clean rag, 30 seconds. Skip this and the VHB peels off by end of week. Magnetic mount is forgiving; adhesive isn't.
03
Attach the sensor
Ferrous housing: drop it in place — the magnetic base grabs hard. Aluminum, plastic, or composite: peel the VHB backing and press firmly for 10 seconds.
04
Attach the tach (Balancer only)
Mount the IR sensor using a dial-indicator magnetic base — the strong magnet holds it steady on any ferrous surface. Point the eye at a sharpie mark on the rotating shaft. Plug the 3.5 mm cable into the sensor's 
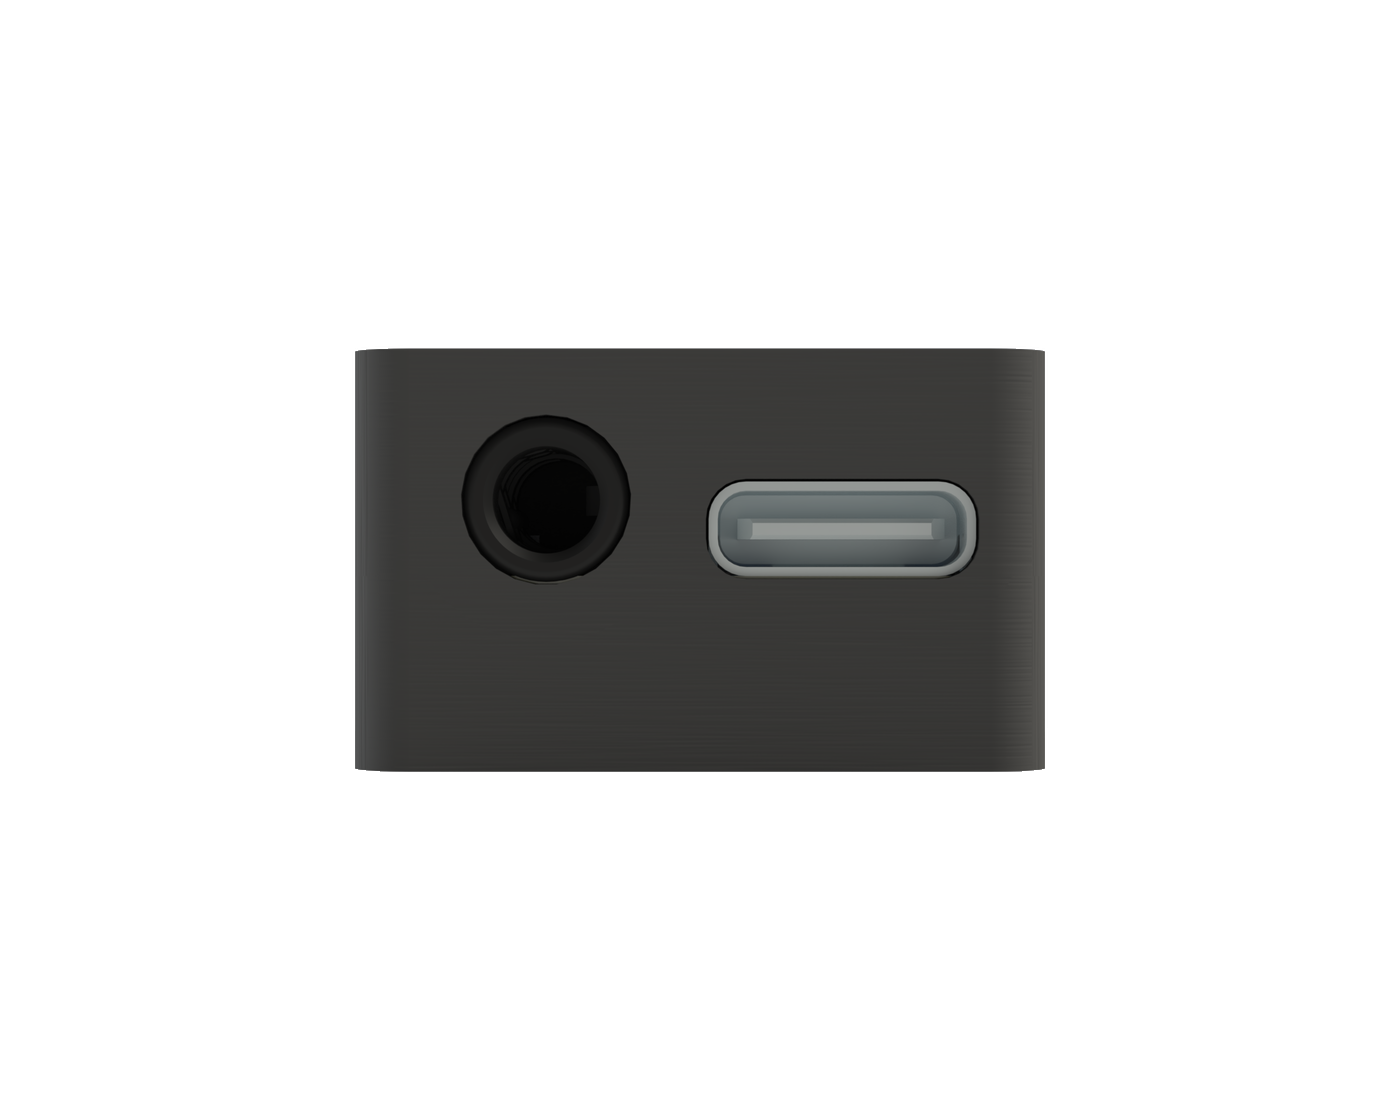
TACH port. Tip: the vibration analyzer can also mount to the mag base's V-block bottom for easy clamping on round housings.
05
Plug in USB-C
LED cycles red → amber → green. Solid green means the Wi-Fi access point is live and accepting connections.
CHAPTER 03

Connect your phone.

The sensor runs its own Wi-Fi access point and a captive portal. No app. No account. No internet.

STEP 01

Open Wi-Fi settings

On iOS: Settings → Wi-Fi. On Android: Network & internet → Internet. You'll see a network named GV-#### — the four characters are your device's unique ID, printed on the label. Connect to that network.

9:41
MY NETWORKS
HomeOffice🔒
OTHER NETWORKS
GV-7A3F
ShopFloor_5G🔒
Guest-WiFi
STEP 02

Join the sensor's network

Tap GV-#### (your device number). No password. The captive portal should open automatically — if it doesn't, navigate directly to http://gv-####.local in your browser.

9:41
JOINING…
GV-7A3F
Connected. No Internet required — this is the sensor's local network.
STEP 03

The dashboard opens

The captive portal loads the measurement dashboard in your phone's built-in browser — the same UI you'll see embedded throughout the rest of this guide. Nothing to install. Close the page to disconnect.

CHAPTER 04

The Live view.

The screen you land on. Purpose: confirm the sensor is attached correctly and read the current health of the machine in under three seconds.

http://gv-####.local/#live
Live · streaming
This is the actual device UI running. Scroll inside the frame.

What to look for

Verdict
The pill top-right
Plain-English summary of the current vibration level. Three states: Low, Elevated, High — investigate. Driven directly from the live RMS reading.
Tach trigger
The pulsing lime dot
Flashes once per revolution. If it's not pulsing, the tach is unplugged or aimed wrong. Quick visual check — beats reading the RPM number.
RPM card
Shaft speed, 1×
Driven from the optical tach, not inferred from vibration peaks. The 1× TACH badge tells you the source.
RMS card
Velocity RMS in g
Plus peak, crest factor, and chassis temp. Crest > 4.5 flags impact-type faults (bearing defects, loose fasteners).
Per-axis
X · Y · Z amplitudes
Dominant axis is highlighted in lime. Radial imbalance shows on X+Y; axial issues on Z.
Waveform
Time-domain trace
500 ms rolling window, three axes overlaid. Good for spotting beat patterns and transients that RMS smooths out.

How the verdict is computed

Low
< 0.05 g RMS
Running clean
Elevated
0.05 – 0.15 g RMS
Worth a look
High
> 0.15 g RMS
Investigate
Baseline matters more than absolute numbers. Every machine has its own healthy RMS — a production router at 0.08 g might be perfectly normal, while a finishing spindle at 0.08 g is already telling you something. Let the sensor run for a shift and use the trend card on the Live view as your real reference.
CHAPTER 05

Spectrum — reading the frequency domain.

The FFT tells a story. Once you know where to look, you can read it in seconds. The Spectrum view is where you diagnose what is wrong, not just that something is wrong.

http://gv-####.local/#spectrum
Spectrum · 0–800 Hz
1× marker
Solid line at shaft speed
Locked to the tach so it tracks when RPM drifts. Imbalance lives here. A tall 1× peak is the textbook balancing problem.
Harmonics
Dashed lines at 2× · 3× · 4×
Dominant 2× → misalignment. 3× and higher → looseness. Non-integer peaks between harmonics → bearing fault frequencies.
Waterfall
Spectrogram, time downward
Lets you watch a defect develop over seconds. Hot vertical lanes mean sustained energy at a specific frequency.
Cursor
Hover to mark a peak
Reports Hz, order (multiple of 1×), and amplitude in g. Match against your bearing's fault-frequency table.
RMS in g is the one number most technicians watch. It tells you the overall intensity of vibration — bigger number, more energy shaking the machine. Use the trend card on the Live view to spot when it starts creeping up over time; rising RMS is usually the first sign something's about to need attention.
CHAPTER 06Spindle Balancer kit

Run a balance job.

Single-plane influence-coefficient balancing. Four runs. GrayVolt tells you exactly where the trim weight goes and how much.

Baseline
Spin up. GrayVolt records amplitude + phase of the 1× peak. This is your starting imbalance vector.
Trial
Add a known weight at a known angle (the UI suggests 2 g at 0°). Spin up again. Now there are two vectors — enough to solve the influence coefficient.
Solution
Remove the trial weight, place the calculated correction. Example: 3.2 g at 214°. Spin up.
Verify
Residual 1× should drop substantially — often to 10% or less of the baseline. If it's still stubborn, the UI prompts for a trim run. Repeat until you're happy.
http://gv-####.local/#balance
Balance · interactive
Drag in the polar to set trial position. Scroll over it to adjust mass.

Why the polar is the hero

You can see the imbalance, not just read it.

Most portable balancers print the answer as two numbers in a spreadsheet cell: "3.2 g at 214°." It works, but you're flying blind.

The polar shows the tech why. As each run completes, a new vector appears in the plot. You can watch how the machine responds to the trial weight, and see at a glance whether your correction is shrinking the imbalance or just moving it around — no mental math required.

How good is "good enough?" That depends on the job — a finishing spindle wants tighter residual than a roughing head, and your fixturing, trial-weight accuracy, and run-to-run repeatability all set the floor. A useful rule of thumb: if the residual has shrunk to a small fraction of the baseline and further trim runs aren't improving it, you've hit your mechanical limit. Stop there — log the reading, then watch the trend.
CHAPTER 07

Log & history.

A flash-backed ring buffer of every significant event since the device was powered on. Think of it as the black box — useful when something goes wrong and you need to correlate with the machine controller's logs.

http://gv-####.local/#log
Log
Alarm
Red gutter
Verdict crossed into High or Critical. Always paired with the RMS reading that triggered it.
Session
Accent gutter
Connect / disconnect events, balance-job starts and completions. Marks the boundaries of a measurement session.
Snapshot
Dim gutter
Manual capture — freezes a 10-second waveform + spectrum. Useful right after a machine event.
Export
Download JSON
One button, no dialog. Emits the full buffer as gv-log-YYYYMMDD.json. CSV variant is firmware-side because it's size-bounded.
CHAPTER 08

Settings & calibration.

Everything that isn't a live measurement. Wi-Fi mode, tach calibration, and the upgrade-code field.

http://gv-####.local/#settings
Settings
Wi-Fi mode
AP · STA · Dual
Most customers run AP only — the sensor hosts its own network. STA lets it join a plant network and post readings to SCADA. Dual does both.
Tach calibration
Live ADC trace + threshold slider
Spin the shaft by hand with this panel open. Auto-detect picks the clean trigger level in seconds. Manual slider for edge cases.
Upgrade code
Paid module unlock
Reserved for future add-ons — extra balance planes, BLE data logger, long-term cloud sync. Leave blank if you don't have a code.
Factory reset
Long-press the button
Hold the hardware button for 10 seconds. LED turns red, then cycles. Wipes Wi-Fi config, saved thresholds, and log buffer.
CHAPTER 09

Troubleshooting.

The short list. If something here doesn't solve it, email the team — we read every message.

TachTach trigger dot isn't pulsing

The sensor isn't seeing pulses from the IR tach.

· Check the 3.5 mm cable is seated fully in the TACH port.
· Aim the IR head at the sharpie mark, not bare shaft. Standoff: 5–25 mm.
· In Settings → Tach calibration, open the live ADC trace and spin the shaft by hand. You should see a clean square pulse. If it's a noisy sine, the IR head is too close or the mark is too faint.
· Re-darken the sharpie mark if it has worn or faded.

Wi-FiPhone connects, but no dashboard loads

The captive portal didn't intercept automatically.

· Open Safari or Chrome and navigate directly to http://gv-####.local or http://192.168.4.1.
· iOS caches DNS aggressively. Toggle airplane mode off/on.
· If the page loads but the connection pill says Reconnecting, you're probably on both the sensor AP and cellular — iOS sometimes routes the WebSocket through cellular. Turn cellular data off on that tab.

NoiseNoise floor is unusually high

The broadband floor between harmonics should be low and flat.

· Check the sensor is firmly seated. Loose mounts read as broadband noise.
· Remove VHB residue from the housing and re-mount. A clean surface is critical.
· If mounting on aluminum with the magnet, swap to VHB — a gap of even 0.5 mm adds a resonance around 800 Hz.
· Check the machine coolant isn't dripping on the sensor. The IP rating is splash-proof, not immersion-proof.

BalanceBalance job never converges

The correction weight doesn't reduce 1× after the solution run.

· Trial weight was too small — the trial response should be clearly distinguishable from the baseline. Try a larger trial weight.
· Run-to-run repeatability is poor. Something else is changing between runs: coolant on/off, ambient temperature, fixturing. Lock those down, then re-baseline.
· The imbalance is in a different plane. Single-plane balancing assumes the weight is concentrated axially; if the imbalance is distributed along the shaft, you need two-plane balancing (future firmware module).

End of guide
Still stuck, or found something we got wrong?
CONTACT THE TEAM →